Spray Gun Troubleshooting
A spray gun that is set up, cleaned and lubricated correctly gives a uniform film and a smooth finish. When the pattern goes bad or the gun starts leaking, the cause is usually something simple: a plugged air cap hole, a worn packing, the wrong pressure or the wrong technique. This guide walks through the most common air spray gun problems, what causes them and how to correct them.
Need parts or a repair? Fluid Transfer Systems is an authorized Binks distributor and repair center. Call (248) 348-6700 or contact FTS.
Jump to: Testing the pattern | Spray pattern faults | Gun and cup problems | Finish defects | Maintenance and lubrication
Start with a test pattern
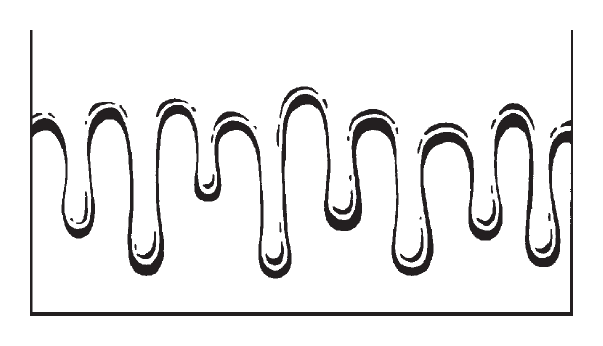
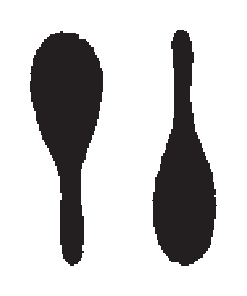
Good: even distribution across the full width
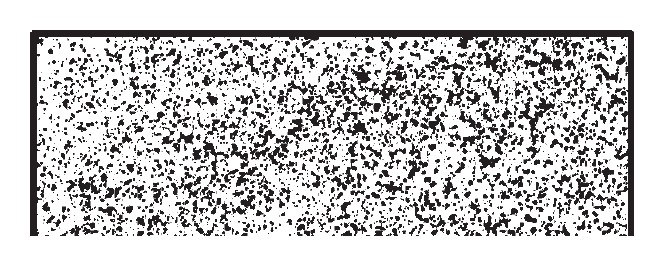
Poor atomization: uneven particle size
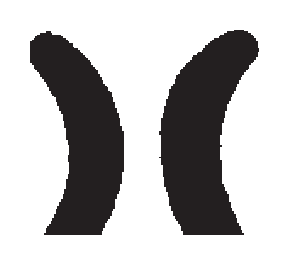
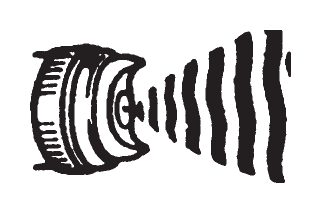
- Distribution check: rotate the air cap so the horns are vertical and spray a horizontal test pattern, holding the trigger open until the paint begins to run. Paint should be evenly distributed across the full width of the pattern. Adjust with the fan pattern adjustment. If it cannot be made even, there is a problem with the air cap or the fluid tip (see the faults below).
- Atomization check: with the fluid adjusting screw open to the first thread and about 30 psi at the gun, make a few fast passes on clean paper. Specks and large globs mean the paint is not atomizing. Increase air pressure slightly and test again until the particle size is uniform.
- Starved pattern: if the fluid screw is open to the first thread and the pattern still looks starved, atomizing air may be too high or the material too heavy. Recheck viscosity or reduce air pressure.
- Too heavy / sagging: reduce material flow by turning the fluid adjusting screw in (clockwise).
- Pressure feed flow rate: with the air cap removed and atomizing air off, trigger into a graduated container for 10 seconds and multiply by 6 to get ounces per minute. Standard finishing is about 14 to 16 oz/min. If fluid pressure at the tank, cup or pump exceeds 20 psi to get there, use the next larger fluid tip.
Spray pattern faults
Heavy top or bottom pattern
| Cause |
Correction |
| Horn holes plugged. |
Clean. Ream with a non-metallic point. |
| Obstruction on top or bottom of fluid tip. |
Clean. |
| Cap and/or tip seat dirty. |
Clean. |
Heavy right or left side pattern
| Cause |
Correction |
| Left or right side horn holes plugged. |
Clean. Ream with a non-metallic point. |
| Dirt on left or right side of fluid tip. |
Clean. |
Air cap or fluid tip? How to tell (top, bottom, left or right heavy patterns)
- Spray a test pattern, rotate the air cap one-half turn and spray another. If the defect flips, the obstruction is on the air cap. Clean the air cap.
- If the defect does not flip, it is on the fluid tip. Check for a fine burr on the edge of the tip and remove it with #600 wet or dry sandpaper.
- Check for dried paint just inside the opening and wash it out with solvent.
Heavy center pattern
| Cause |
Correction |
| Fluid pressure too high for atomization air (pressure feed). |
Balance air and fluid pressure. Increase pattern width with the spreader adjustment valve. |
| Material flow exceeds the air cap’s capacity. |
Thin or lower fluid flow. |
| Atomizing pressure too low. |
Increase pressure. |
| Material too thick. |
Thin to proper consistency. |
Split spray pattern
| Cause |
Correction |
| Fluid adjusting knob turned in too far. |
Back out counterclockwise to achieve proper pattern. |
| Atomization air pressure too high. |
Reduce at the air regulator. |
| Fluid pressure too low (pressure feed only). |
Increase fluid pressure. |
| Spreader adjusting valve set too high. |
Adjust by turning in clockwise. |
Jerky or fluttering spray
| Cause |
Correction |
| Loose or damaged fluid tip/seat (most common cause). |
Tighten or replace. |
| Material level too low. |
Refill. |
| Container tipped too far. |
Hold more upright. |
| Obstruction in fluid passage. |
Backflush with solvent. |
| Loose or broken fluid tube or fluid inlet nipple (suction or pressure feed). |
Tighten or replace. |
| Dry or loose fluid needle packing nut. |
Lubricate or tighten. |
| Damaged fluid needle packing. |
Replace. |
| Suction feed only: material too heavy. |
Thin or replace. |
| Suction feed only: air vent in cup lid clogged. |
Clear vent passage. |
| Suction feed only: loose, damaged or dirty lid. |
Tighten, replace or clean coupling nut. |
| Suction feed only: fluid tube resting on cup bottom. |
Tighten or shorten. |
| Suction feed only: damaged gasket behind fluid tip. |
Replace gasket. |
Unable to get a round spray
| Cause |
Correction |
| Fan adjustment screw not seating properly. |
Clean or replace. |
| Air cap retaining ring loose. |
Tighten. |
Starved spray pattern
| Cause |
Correction |
| Inadequate material flow. |
Back the fluid adjusting screw out to the first thread, or increase fluid pressure at the tank. Clear the cup vent. |
| Low atomization air pressure (suction and gravity feed). |
Increase air pressure and re-balance the gun. |
Gun and cup problems
Will not spray
| Cause |
Correction |
| No air pressure at gun. |
Check air supply and air lines. |
| Internal mix or pressure feed air cap and tip used with suction feed. |
Change to the proper suction feed air cap and tip. |
| Fluid pressure too low with internal mix cap and pressure tank. |
Increase fluid pressure at the tank. |
| Fluid needle adjusting screw not open enough. |
Open the fluid needle adjusting screw. |
| Fluid too heavy for suction or gravity feed. |
Thin material or change to pressure feed. |
Fluid leaking from packing nut
| Cause |
Correction |
| Packing nut loose. |
Tighten, but do not bind the needle. |
| Packing worn or dry. |
Replace or lubricate. |
Fluid leaking or dripping from front of gun
| Cause |
Correction |
| Packing nut too tight. |
Adjust. |
| Dry packing. |
Lubricate. |
| Fluid tip or needle worn or damaged. |
Replace tip and needle with matched sets. |
| Foreign matter in tip. |
Clean. |
| Fluid needle spring missing or broken. |
Replace. |
| Wrong size needle or tip. |
Replace. |
| Needle bound by misaligned sprayhead (MBC guns only). |
Tap the sprayhead perimeter with a wooden mallet. Retighten the lock bolt. |
Paint bubbles in cup
| Cause |
Correction |
| Fluid tip not tight. |
Tighten. |
Fluid leaking or dripping from cup lid
| Cause |
Correction |
| Cup lid loose. |
Push in or replace. |
| Dirty cup or lid. |
Clean. |
| Cracked cup or lid. |
Replace cup and lid. |
Fluid dripping or leaking from bottom of cup
| Cause |
Correction |
| Cup loose on gun. |
Tighten. |
| Cup threads dirty. |
Clean. |
| Cup gasket damaged or dirty. |
Replace. |
Finish defects and overspray
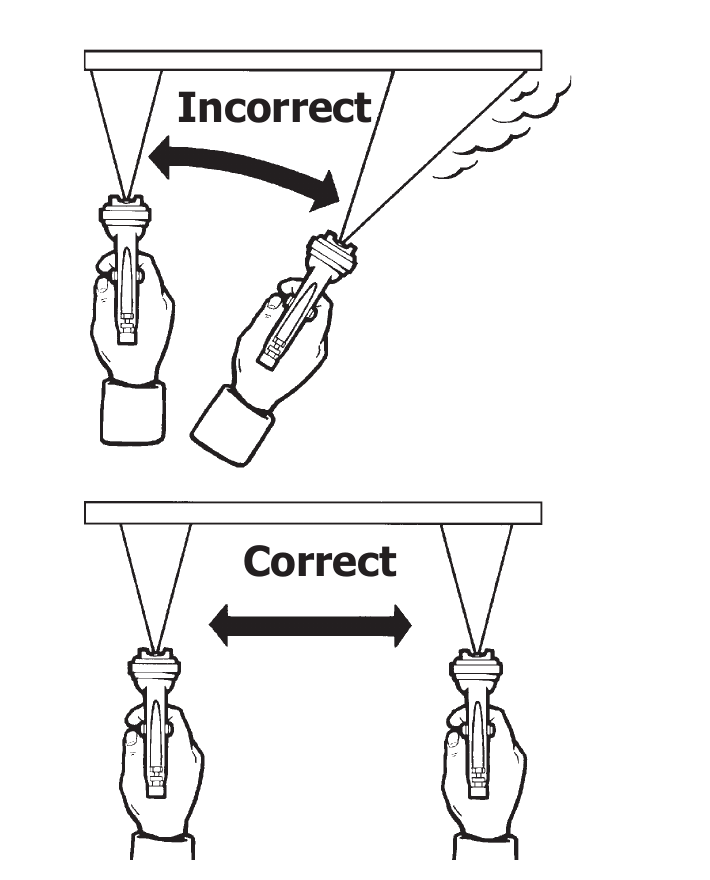
Good technique prevents many finish defects:
- Hold the gun perpendicular to the surface, 6 to 8 in. away for HVLP guns or 8 to 10 in. for conventional suction, gravity or pressure feed guns.
- Don’t tilt or arc the gun. Tilting causes uneven build, runs and sags.
- Trigger just before the edge of the part, hold the trigger fully depressed through the pass, and release past the far edge while continuing the motion.
- Overlap each stroke 50%. Less overlap leaves streaks. Move at a constant speed.
- Spray edges and corners first (banding) to reduce overspray and cover corners well.
Excessive overspray
| Cause |
Correction |
| Too much atomization air pressure. |
Reduce pressure. |
| Gun too far from work surface. |
Adjust to proper distance. |
| Improper stroking (arcing, gun motion too fast). |
Move at a moderate pace, parallel to the work surface. |
Excessive fog
| Cause |
Correction |
| Too much, or too fast-drying, thinner. |
Remix properly. |
| Too much atomization air pressure. |
Reduce pressure. |
Dry spray
| Cause |
Correction |
| Insufficient material flow. |
Increase fluid pressure or change to a larger tip. |
| Air pressure too high. |
Decrease air pressure. |
| Material not properly reduced (suction feed). |
Reduce to proper consistency. |
| Gun tip too far from work surface. |
Adjust to proper distance. |
| Gun motion too fast. |
Slow down. |
| Gun out of adjustment. |
Adjust. |
Runs and sags
| Cause |
Correction |
| Too much material flow. |
Adjust the gun or reduce fluid pressure, or change to a smaller tip. |
| Material too thin. |
Mix properly or apply light coats. |
| Gun tilted at an angle. |
Hold the gun at a right angle to the work and use proper gun technique. |
Thin, sandy, coarse finish that dries before it flows out
| Cause |
Correction |
| Gun too far from surface. |
Check distance: normally 6 to 8 in. (HVLP), 8 to 10 in. (conventional). |
| Fluid tip too small. |
Change to a larger tip. |
| Too much air pressure. |
Reduce air pressure and check the spray pattern. |
| Improper thinner being used. |
Follow the paint manufacturer’s mixing instructions. |
Thick, dimpled “orange peel” finish (too much material, coarsely atomized)
| Cause |
Correction |
| Gun too close to surface. |
Check distance: normally 6 to 8 in. (HVLP), 8 to 10 in. (conventional). |
| Fluid tip too large. |
Change to a smaller tip. |
| Air pressure too low. |
Increase air pressure or reduce fluid pressure. |
| Improper thinner being used. |
Follow the paint manufacturer’s mixing instructions. |
| Material not properly mixed. |
Follow the paint manufacturer’s mixing instructions. |
| Surface rough, oily or dirty. |
Properly clean and prepare. |
Maintenance and lubrication
Cleaning the air cap
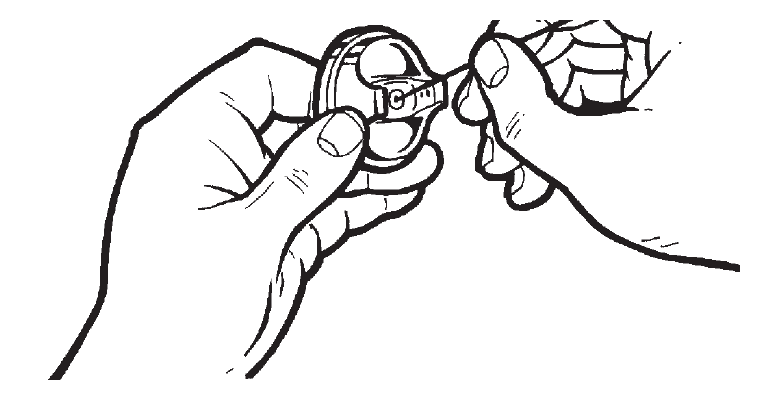
Remove the air cap, immerse it in clean solvent and blow it dry with compressed air. If the small holes are clogged, soak the cap in clean solvent. If the holes must be reamed, use a toothpick, broom straw or other soft implement. Never use a wire, nail or other hard object. It can enlarge the jets and permanently ruin the spray pattern.
Never soak the entire gun in solvent. It dries out the packings and removes lubrication.
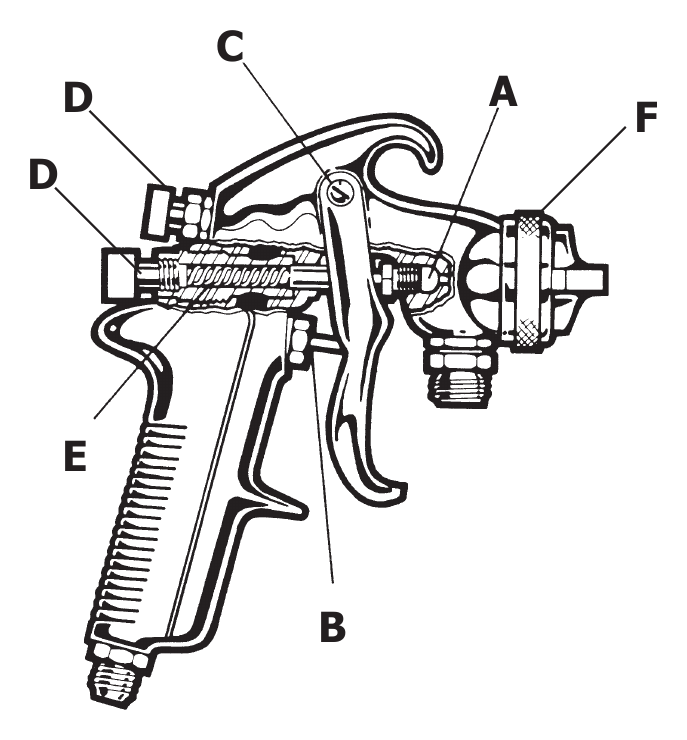
Daily lubrication points
| Point |
Service |
| A: Fluid needle packing |
Spray gun lube, daily |
| B: Air valve packing |
Spray gun lube, daily |
| C: Trigger bearing screw |
Spray gun lube, daily |
| D: Adjusting screw threads |
Spray gun lube, daily |
| E: Fluid needle spring |
Light coat of petroleum jelly |
| F: Air cap and baffle threads |
Clean thoroughly, then spray gun lube, daily |
Lubricate each of these points after every cleaning in a gun washer.
Replacing parts
- Turn the fan adjustment knob out before installing the fan adjustment assembly. If left in, the stem or needle can jam against the seat.
- Pull the trigger or remove the fluid adjusting screw before tightening the fluid tip, to avoid tip and needle damage.
- Replace packings and gaskets whenever an assembly is removed or during an overall repair. Replace the fluid needle packing when the packing nut bottoms out.
- Oil new packings and needles before assembly. Tighten packing nuts only enough to seal. Too tight binds the needle and shortens packing life.
- Replace the fluid tip and fluid needle together. Matched sets are available for most guns.
Shop spray guns and parts
Browse our Spray Guns category, including Binks Spray Guns, DeVilbiss Spray Guns and Graco Spray Guns. More answers are on our Paint Finishing FAQ.
Based on Binks service literature.
Get your spray gun back on line
Fluid Transfer Systems is an authorized Binks distributor and repair center. For repair, rebuild kits, air caps, fluid tips and needles, or help diagnosing a spray problem, call (248) 348-6700 or request a quote from FTS.